SKU must be a unique identifier in a warehouse system, the smallest unit to distinguish different products. The system supports users in adding, deleting, modifying, filtering and viewing products. After OMS creates a product, it will be automatically submitted to the WMS.
1. Login to your OMS account
Login: https://seller.shipa2z.com/login
2. Create Standalone Product
Click Products > Standalone Products > Add New Product > Add Product Information > Save
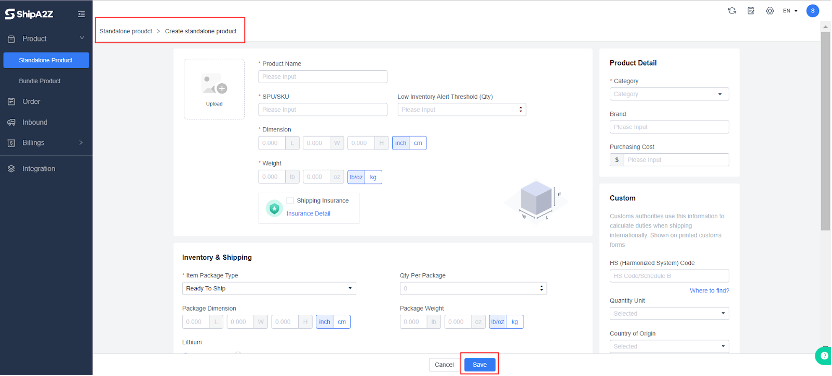
Product Information Details:
Product name: Required, support Chinese and English.
SPU/SKU: Required. It needs to be consistent with the product label to facilitate the warehouse to scan and identify when receiving;
Low Inventory Alert Threshold (Qty): When the inventory reaches the set value, there will be a reminder.
Size: Required. The size and weight of the product should be filled in accurately to calculate the storage and freight-related costs.
Weight: Required. The size and weight unit should correspond to each other, i.e., in/lb or cm/kg.
Shipping insurance: When using ShipA2Z’s shipping service, you may add the insurance declaration here if needed.
Product picture: To facilitate warehouse identification of products.
Category: Required. Select the corresponding classification.
Brand: Optional fields.
Purchasing Cost: Optional fields
Inventory and Logistics
Package Type:
- Ready To Ship: The product has its complete package. No additional packing is needed for outbound.
- Package Needed: It needs to add packing material before outbound.
Qty Per Package: The Qty of products in a single box, and it is recommended to add this data if the specifications of the inbound and outbound boxes are the same.
Package Dimension: If the inbound and outbound box specifications are the same, it is recommended to add this data.
Package Weight: if the inbound and
outbound box specifications are the same, it is recommended to add this data.
Lithium: If the product contains batteries, check the corresponding battery option.
Variants
- Variants mean multiple options for the same product, such as different sizes or colors. And for different variants, we recommend keeping the same size and weight of the product and carton.
- Each variant can add low stock alarm thresholds and barcodes and add mapping of products from different e-commerce stores.
Alias Mapping: Match and associate different SKUs of the same product to facilitate the system to identify and locate products in e-commerce stores and those in the system. Thus, order and inventory can be synchronized.
SKU attachment information
- Barcode: you can add the EAN/FNSKU/UPC/ASIN/other barcode corresponding to the product. It is recommended to fill out the specific FNSKU and ASIN codes of the products of the Amazon store to facilitate subsequent product management.
- Store mapping: For the products selling online, if the SKU for different stores is inconsistent with the system SKU, it is necessary to map and match the SKU of the store and the system
- Store name: You need to connect stores on different platforms to the OMS system before selecting the stores to map
- Store SKU: SKU of the corresponding e-commerce store
Customs information
- For international shipments, it is necessary to fill in the “Customs Information” printed on the customs form and used by the customs authorities to calculate the customs duties for international shipments.
- Customs Harmonization Code: HS code/Schedule B, found in the link “Find Customs Harmonization Code.”
- Customs declaration unit: Drop-down selection
- Country of origin: Drop-down selection
- Declared value: the declared value of the product
3. Bulk Creation of Products
Click Products > Standalone Products > Add Products > “Import” in the upper right corner.

Download a sample file.
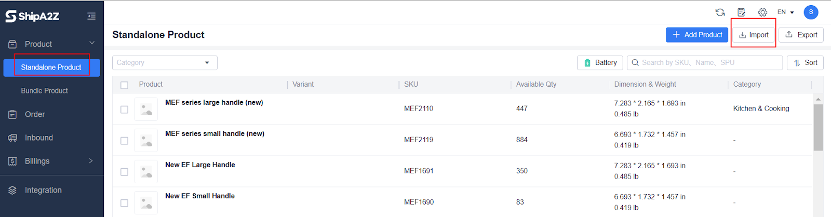
Fill in the form information. The filling rules are consistent with the rules for creating standalone products. For “countryCode,” refer to Sheet2 in the form.
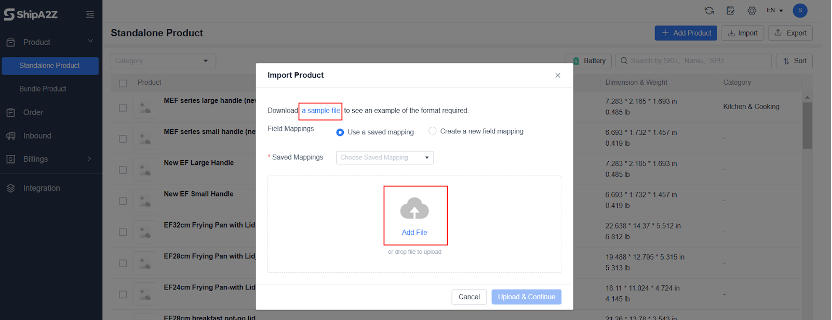
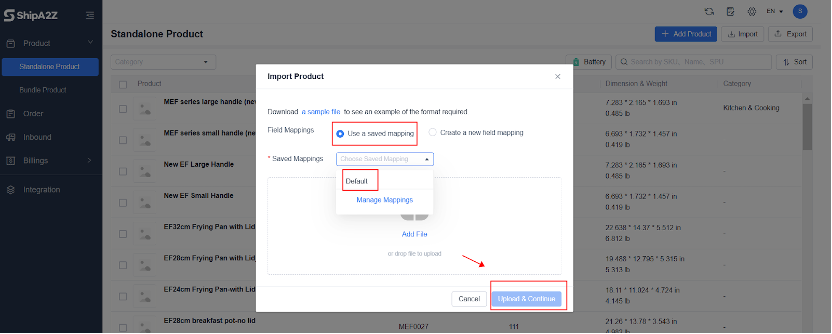
Save the Excel file> click “Import” > select “Default” > “Add File” > upload the sheet >Upload & Continue
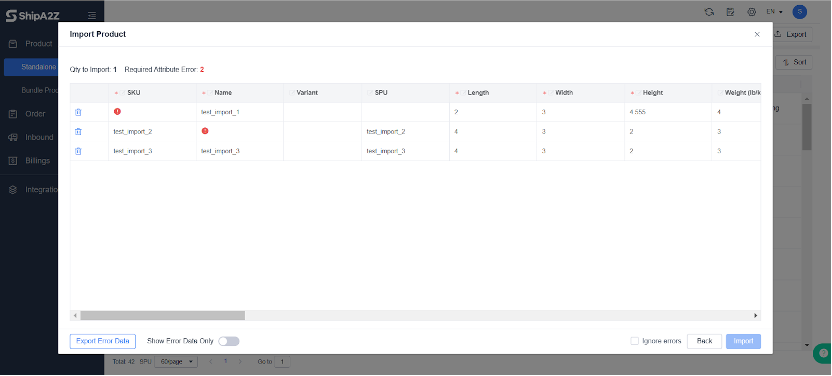
The system will identify the correctness of the form data and display the correct and incorrect quantities in the upper right corner of the interface. After confirming the accuracy of the information, click “Import” to complete the batch creation of products.
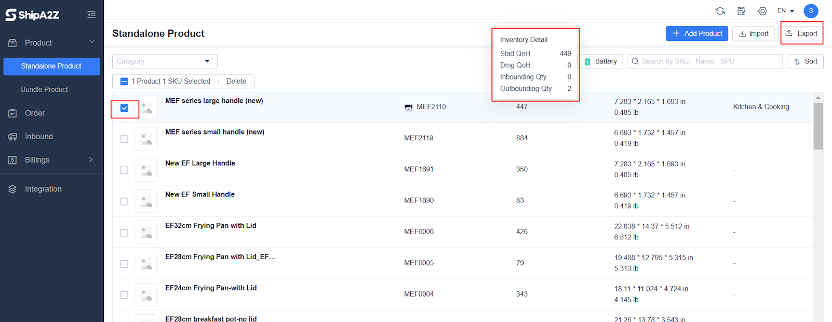
5. View Product Inventory
After the product is created, you can submit an inbound order. And when the warehouse receives it, the inventory will be generated accordingly.
On the product page, you can view the inventory of different products, or you may also select “Export” in the upper right corner to view the inventory of different products.